How To Propagate Anthurium | Caring For Propagated Anthurium

Have you ever considered propagating your own Anthurium plants? If so, you’ve come to the right place! Propagating your own Anthurium plants is an incredibly rewarding experience and allows you to appreciate the beauty of these stunning plants even more. Let’s dive into it!
Anthurium is simple to propagate, but having a guide to help you through it makes it so much better! First, decide whether you want to propagate your plant from stem cuttings, root division, or from seed. Then, gather some propagation tools and equipment, and get started!
There are several tools that will make your propagation go smoother, and I’ll include those below. But the minimum you will need to propagate your anthurium plant are:
Items that are great to have on hand (but are not required) for your propagation include:
Depending on whether you are propagating with stem cuttings, from divisions, or from seed, your next steps will be slightly different. Feel free to read through each section below, or skip to the relevant section for the way you are choosing to propagate your anthurium.

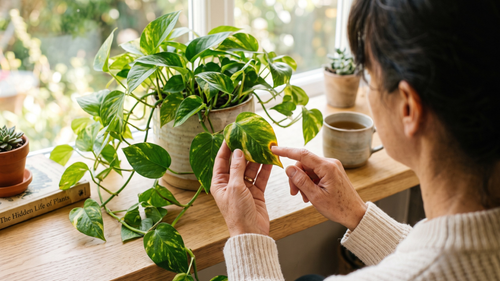
If you already have a plant that you will be propagating from, make sure it is healthy and pest-free before you begin. You’ll want the healthiest plant available to ensure your cutting has the best chance of survival. If you are taking a cutting from a friend, or buying a cutting online, make sure you know how healthy the plant is first.
Stem cuttings are the best way to propagate nearly any houseplant. With anthuriums, it’s actually only the second best way to propagate your plant, but it’s still a simple, straightforward method.
Here’s how to take a stem cutting from an anthurium plant:
From here, there are a few options. Each with their own list of pros and cons.
To root your cutting in soil, plant the stem cutting in a pot filled with moistened potting mix. Backfill with mix to hold the stem in place, press the soil down around the stem, and water thoroughly. Keep the soil moist but not soggy, and provide bright, indirect light in a warm spot.
Be careful not to let the soil dry out, as this will prolong the roots from forming. At this stage, you can also use a moisture meter to ensure your cutting is getting the right amount of water.
In 6+ weeks, you should see new growth appear on the cutting. Once the cutting has rooted and established itself, you can transplant it into a larger pot or into your garden.
This method is easy, but tricky. You run a risk of fungus or mold growth, since the soil has to be kept moist for roots to establish. This plant does not root quickly, so this risk is higher than any other typical houseplant, which is one of the reasons many people prefer rooting in water.
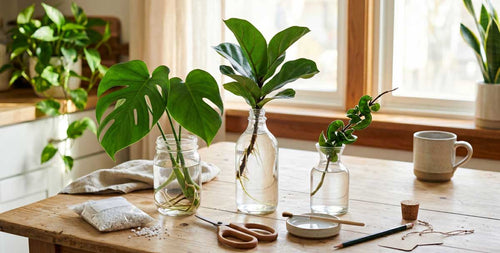
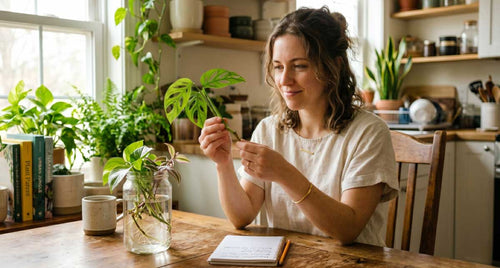
To root your cutting in water, all you have to do is place the stem in a jar or vase of water, and make sure that the leaf is above the water line. Change the water every 2-3 days to keep it fresh and prevent the growth of any type of fungus or bacteria.
With Anthurium plants, this can get rather tedious as you wait 6 weeks or more to see any root growth, but some people will always choose to propagate in water because it typically has the best outcome.
Within 6-8 weeks, you should see new roots growing from the stem. Once the roots are about 1-2 inches long, you can transplant your new plant into potting soil. Be sure to keep the soil moist but not soggy, and provide bright indirect light.

Anthurium plants can be propagated from root divisions, too! Anthuriums are one of the few plants that are able to be propagated this way, it is a favorite of many anthurium parents because of how simple it is to do, and the success rate is much higher than other ways of propagating.
To divide an anthurium root, first dig up the entire plant. Carefully loosen the soil around the roots, taking care not to damage them. You may want to gently wash the soil away from the roots by dipping the roots in a pot of water and working the soil away from them.
Then, gently pull the plant apart into two or more sections, making sure each section has at least one healthy root (preferably two to three healthy root systems). Replant each section in its own pot with a well-draining potting mix.
Water your newly propagated plant well and keep the soil moist. Use a moisture meter to monitor the moisture level in the soil. This will prevent problems like root rot or fungus growth while your newly propagated plant is still recovering from being propagated.
Anthuriums can be propagated from seed, also. Typically, it’s just like growing any other plant from seed. You will need to start with fresh seed that has not been allowed to dry out. You can either purchase fresh seed or collect it yourself from a healthy anthurium plant. Make sure to clean off the sticky pulp from the seed before sowing it.
Once you have your fresh seed, you will need to sow it, and there are a few different ways you can choose to do this.
Option 1: Sow the seed in a well-draining potting mix that is kept moist but not soggy. Very lightly cover the seed, it does not need very much cover, and some seeds even prefer not being covered at all during the germination process.
Option 2: Many people have luck germinating on top of sphagnum moss. To do this, simply put some sphagnum moss inside your pot, and place the seed on top of it.
Option 3: Wet a paper towel, and place it on a tray with the seed on top of the towel. This is the simplest of the methods, but requires the most attention after germination. If you use this method, make sure to plant the seedling in a well-draining potting mix once you begin to see root growth. Don’t let the roots grow into the towel, as they can easily be damaged when removing the towel to plant the seed.
With each method, make sure the seed does not dry out, and always place a dome, glass, or plastic over the pot/container where your seed is to mimic a greenhouse effect and keep the seed warm.
Once the seeds have germinated, you will need to thin them out so that only one or two plants are growing in each pot. Transplant the extras into their own pots filled with well-draining potting mix. Water each of them well and place in a warm location out of direct sunlight. Allow the plants to grow for several weeks before transplanting into their final location or larger pots.
Once you have successfully propagated your anthurium, it is important to care for your new plants properly to ensure they thrive. Here are some tips for caring for anthurium after propagation:
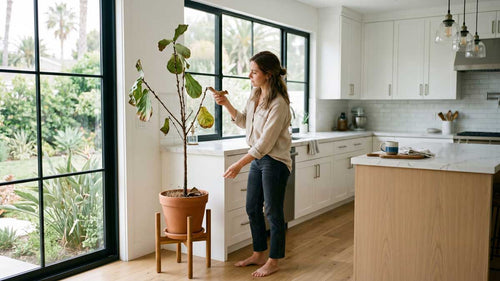
The amount of light your anthurium plant receives is important to its health and vigor. Too little light will result in fewer blooms and overall lackluster growth. Conversely, too much light can cause the leaves to become bleached or burned.
The ideal location for your anthurium plant is in a spot that receives filtered sunlight throughout the day. If you cannot provide filtered sunlight, placing your anthurium near an east-facing window should suffice. The use of grow lights can significantly improve the health of your plant if your home does not get very much natural light.
Anthurium plants are tropical in origin and prefer warm, humid conditions. If you’re propagating anthurium in an area that doesn’t have these ideal conditions, you’ll need to take steps to create a more hospitable environment.
If you’re propagating anthurium in a cool climate, you may need to provide additional warmth with a heat mat or grow light. These can help maintain consistent temperatures and prevent your plants from going into shock due to temperature fluctuations. Anthurium plants thrive in temperatures ranging from 70 to 90 degrees Fahrenheit.
Equally as important as the temperature around your plant is the humidity. One way to create humid conditions is to use a humidity tray. Place your potted anthurium plant on top of the gravel or stones in the tray. The evaporation of the water will add moisture to the air around the plant.
You can also mist around your anthurium plant regularly with a spray bottle filled with water. Just be sure not to oversaturate the leaves, as this can cause leaf rot. Using a humidity meter will take any guesswork out of how much to mist your plant.
Most anthuriums like rich, well-drained soil that is high in organic matter. A good potting mix for anthuriums contains equal parts peat moss, perlite, and bark chips or coarse sand. You can also use a soilless mix, which is lighter and easier to work with. You can also use potting soil that is designed for African violets, which has a very similar composition to what your Anthurium would need.
Water is an essential part of caring for propagated anthurium plants. Be sure to water the plants regularly, keeping the soil moist but not soggy. Allow the top inch of soil to dry out between watering. If the leaves of your anthurium start to wilt, that is a sign that it is not getting enough water.
Anthuriums can be sensitive to fluoride, which is found in some water sources and fertilizers. If you live in an area with high levels of fluoride in the water, you may need to use distilled or rainwater for your plants.
When choosing a fertilizer for your newly propagated plant, use a fertilizer that is specifically formulated for anthuriums or other acid-loving plants. The first couple months after propagation, only fertilize your plant with half of the suggested amount. Giving your newly propagated plants too much fertilizer could possibly send them into shock.
After a couple months, you should fertilize your anthurium plant monthly during the growing season (spring through fall) with the regular suggested amount on the fertilizer packaging. Reduce the frequency to every other month during the winter.
Over-fertilizing can be detrimental to anthurium plants, so it’s important to follow the manufacturer’s directions on how much fertilizer to use. If you’re unsure, it’s always better to err on the side of using less rather than more.
One of the most common problems after propagating anthurium plants is that the new plants do not get enough light. This can be a big problem, because anthuriums need a lot of light to grow well. If your new plants are not getting enough light, they will probably start to wilt and die.
Another common problem after propagating anthurium plants is that the roots do not have enough space to grow. This can happen if you use too small of a pot or if you plant the new plants too close together. If the roots do not have enough space, they will start to crowd each other and the new plants will not be able to get the nutrients they need to grow.
If you are having problems with your new anthurium plants, make sure to check that they are getting enough light and that their roots have enough space. If you still cannot get your new plants to grow, you may need to buy some more anthuriums and try again!
Yes, you can propagate anthurium from leaf cuttings. The process is very similar to the process outlined above, and can be completed just as easily. Follow the steps above and your leaf cutting should propagate just fine!
Looking for more houseplant info? We highly recommend our super informative (and FREE!) Houseplants for Beginners Webinar. Check out our community of other plant lovers in our Facebook group. And if you’re looking for handy go-to reference for all your houseplant needs, check out our Houseplants for Millennials book.


We are an Amazon Certified Small Business! Small businesses are the backbone of the US economy; they create jobs and drive innovation. We appreciate YOU helping small businesses on Amazon!